VMWare and RTNETLINK answers: File exists error

Last night I discovered just how frustrating Linux can be and my night of frustration started with VMWare and by accidently pulling the power cable on my VM server box.  This is what I was presented with once I restored the power

VMwareESXIcopiedit

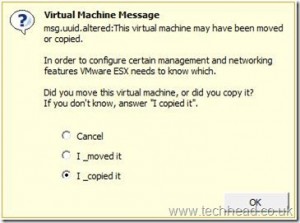
Cancelling would produce no result so I selected that I copied it; which was a bad move 🙂  You see, I’m of the school of thought that if you move something you’re pretty much supplying it with a new address.

Take this analogy, if you’re living at (say) #12 Smith Street and you move across the road to #11 Smith Street, in order for you to still receive your mail you’d have to update your address details.  But let’s say you continue to live at #12 but you’ve taken a fancy to the hot chick living at #11 and seem to spend more time living there than at home.  In this case, of course you wouldn’t redirect your mail as you’ve effectively copied your living arrangements to two seperate addresses.

This is where VMWare admin works a little differently and this post written by Simon Seagrave explains VMWare’s UUI’s beautifully.

So through my folly, I’d effectively altered the MAC addresses for both of my VM’s.  So why is Linux getting the brunt of my frustration?  Because I feel lead astray and it took me most of the night to figure it out.

Basically, my static network settings within the ifcfg-ens160 file were being over-ridden and a new IP address was being issued dynamically through DHCP.  So I’d attempt to restart the network and it would return a RTNETLINK answers: File exists error.

I happened upon this post byMensaWater who suggested that I should try

         ifdown ens160:1; ifdown ens160; ifup ens160

On it’s own this did nothing.  No, in fact it did return

         Device has MAC address 00:00:00:00:00 00:12:34:45:AB:EA, instead of                    configured 00:12:34:43:C0:BA.  Ignoring,

According to this my MAC address had changed so I updated the ifcfg-ens160 file with the new MAC address and still no change.

Eventually I found that I had to stop, then disable NetworkManager with

         systemctl stop NetworkManager
         systemctl disable NetworkManager

At this point, MensaWaters advice worked a charm and my old static IP address was fully restored.

I don’t recall ever using NetworkManager and everywhere I look people suggest to not only disable it but in some cases to remove it altogether.  So my question is, what is it doing there if it creates so much frustration?

Never the less, the VM’s are back up…..


Onto the next project

For nearly 20 years, I’ve held onto the original SCSI hard drive that my old BBS used to reside on and for sometime I’ve contemplated the idea of attempting to restore the contents of that drive into another Amiga just for curiosities sake.  I’ve often glanced at it and wondered whether or not it still works.  So for a few years now, I’ve been searching for a boxed Amiga to return it to, however boxed Amiga’s have become somewhat of a collectors item in recent years, and it’s become somewhat futile.  I found an Amiga A4000/040 with a Picasso card the other day for over $3500US! 🙁

Anyway, this past week my curiosity has gotten the best of me and this morning I’ve taken the first big step into attempting to restore the contents of the drive by purchasing an Adaptec AHA-2940UW SCSI PCI controller card off ebay.  I had intended to put it in an old PC I had lying around which fired up ok but it appears to be generating a long BIOS beep code which is usually akin to a memory error.  The trouble is, it doesn’t do it all the time though which is annoying.  It’s making me wonder whether or not there’s a short somewhere perhaps.  Later, I may have a closer look at that.  But for the time being, I’ll wait for the card to arrive then I’ll go from there.


Setting up Windows Live Writer–rename xmlrpc.php

Well, this evening has been my second attempt at setting up some offline blog publishing software for use with my WordPress sites.  I’d tried both Blog-Desk and Windows Live Writer before given the quality of reviews both have been getting, but do you think I could get either of them configured?  Hell No!

Let’s start with Blog-Desk.  Everything is fine with the setup right up until it asks you for the Blog-ID.  It wouldn’t accept a sausage instead returning me a nice 403 Error for my trouble.  So I gave up on it.

So I thought I’d try Windows Live Writer.  Like Blog-Desk, it installed fine with no errors.  Go to setup my blog using the wizard and all is fine and dandy until it asks for the exact path to xmlrpc.php.  And everytime it would return that it couldn’t find the URI (Universal Resource Identifier).

Nothing worked until I happened upon this forum post here   Thanks to fullphaser, I changed the name of xmlrpc.php file to blogdesk.php, and as he said “it now works”.

And the weird thing is, it works in both Blog-Desk AND Windows Live Writer.

Don’t forget to back up your xmlrpc.php file before you try this (as always)

Setting up Windows Live Writer for WordPress Procedure:

    1. Rename your xmlrpc.php file to blogdesk.php

    2. In Windows Live Writer, from the File tab select Options

    3. Select Accounts from the next window that opens then select the Add     button

    4. Select Other services, when asked “What blog service do you use?

image

    5. The next window will ask you to Add a blog account.  Insert the web address to the site where you WordPress install resides, followed by the Username (don’t use admin) that you use to post on your WordPress blog and the password.

image

    6.  Next you’ll be asked to Select a blog type.  Most WordPress sites these days will select WordPress 2.2+ as the type of blog.  Then in the Remote posting web address box place the full web address to where your blogdesk.php file resides.  Don’t insert myblog.com/public_html/blogdesk.php if that’s where your file resides.  You’d instead use myblog.com/blogdesk.php.

image

Windows Live Writer will configure itself from here on in.

How this worked for me given that the very first step asks me to do something contrary to the type of blogging site I have; I’ve no idea.  But for some insane reason it’s worked for me and it’s also worked for someone else as well.

Hopefully this helps someone.

Transfer Multiple WordPress Posts to Another Author

I encountered a situation earlier this afternoon and after a bit of searching found the answer courtesy of Pizdin Dim here

I recently restored our Sox N Dots site from backup and because I’d only created an admin account, all of our posts had been migrated onto that account.  Not ideal and of course, WordPress doesn’t provide the facility to bulk transfer posts to another user.  I knew at this point that I’d have to find a MySQL solution though my knowledge of SQL is limited to such simple commands as SHOW, CREATE and SELECT.

That’s when I happened upon PizDin Dim’s forum post to use the following:

update wp_posts set post_author=NEWID where post_author=OLDID

Place your new author’s ID (Not the name, the ID number) as the NEWID and obviously the other is old author’s ID number.  Did the job, and it did it properly too.

Don’t forget to backup your database first.